Incubation in the Classroom: Hatching chicks with your students


Incubation and hatching in the classroom is one of the most amazing experiences you will provide your students. It’s a first-hand view of life and can be an experience your students will never forget. I hatch chicks with my students at least once a year—sometimes twice. And each time it is the talk of the entire school.
What you’ll need
Once you decide to hatch chicks with your students, the first thing you’ll need to do is make sure you have the right equipment. The following should make for a fun and successful experience for you and your students.
Incubator – There are many different incubators on the market—some people are even handy enough to build their own. I recommend units with an automatic thermostat to maintain a temperature of 99.5° F to 100°F. If you’re looking at a Styrofoam incubator, look for a plastic liner to make clean up easier. And don’t forget: the bigger the viewing window, the better!
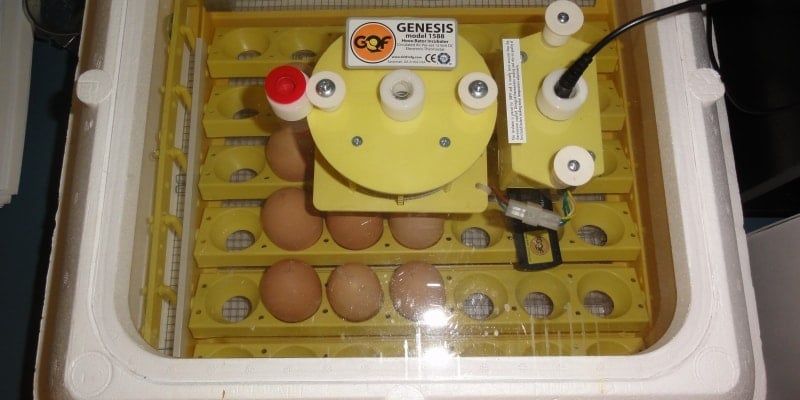
Automatic egg turner – While not a requirement, automatic egg turners are highly recommended. Eggs need to be turned in the incubator three to five times a day, just like the mother hen would do in her nest. While you can manually turn all the eggs, an automatic egg turner is a great assistant to the teacher—especially on weekends. The egg turner also provides additional stability so if the incubator gets jostled during the first 18 days, the eggs won’t roll into each other.
Thermometer – Test your thermometer to make sure you get an accurate reading and keep a replacement on hand just in case.
Hygrometer – The level of humidity is an important factor in achieving a successful hatch. The eggs need a certain level of moisture in order for the chicks to make it out of their shells.
Electricity – Both your incubator and egg turner need to be plugged in, an important consideration when choosing a location. If you use extension cords, remember to tape them to the floor for safety.
Water – Most incubators will need water added to keep optimal humidity levels—I keep a small pitcher of water nearby to add as needed.
Flashlight or candler – Candling with your students is both fun and necessary. By illuminating the egg with a light, you can determine which eggs are developing and those to discard.
Finding eggs – The next step after acquiring the equipment is finding fertile eggs. I like to start with between 12 to 24 eggs to better the chances of having at least one hatch during the school day.
There are many places to obtain eggs for your hatch, but there are a few things to keep in mind on your search. Online sources, like MyPetChicken.com, sell fertile hatching eggs that are delivered to your house. However, the jostling they experience on their journey reduces the hatching percentage.
You may find eggs at a local farm or from a neighbor’s backyard flock, but it’s important to make sure the eggs come from a home with both hens and roosters, otherwise they won’t be fertilized. For best results, check to see that there is at least one rooster for every ten hens and ask if the seller has been successful hatching their own eggs.
Another question to ask before incubation is what to do with the chicks once they hatch. Chicks require responsible owners to provide them with good care as they grow. If you want to take the chicks home yourself, great! But if not, there are other options. If the eggs came from a backyard flock or a local farm, the owners may take the chicks back once they’ve hatched—it doesn’t hurt to ask at the time of purchase.
Additionally, check online for local chicken groups. It’s usually free to become a member and you can post in their forum to see if anyone is interested in providing a home for the chicks. Craigslist or other online classifieds allow you to create free ads to find a home for your hatchlings. Alternately, starting a chicken flock at your school is an excellent solution that continues the learning experience, too.
Whichever path you choose, once you have fertilized eggs, you’ll need to store them at room temperature until you’re ready to put them in the incubator. This should take no more than seven days—the fewer the better. If the eggs are unclean, gently wipe off dirt or debris with a dry cloth.
Preparation and set up
Take a look at your personal and school calendars to choose what day you would like your chicks to hatch. I like Wednesdays—if the chicks come a day early or late, we’re still in school. Next, count back 21 days, the time it takes for chicken eggs to hatch.
When choosing your hatch date, look at all 21 days and make note of any holidays, picture days, or other events that might make it difficult to take care of the eggs or take your students out of your classroom on or near hatching day.
Now is the time to make sure everything is operating properly. Set up your equipment two days before you plan to place your eggs in the incubator. Place the incubator near your desk if possible—on top of an extra student desk works great. This allows your class the chance to view the eggs often while offering you easy access to monitor what needs to be done. Plus, it minimizes the chance of students inadvertently bumping the machine.
Make sure your classroom is temperature controlled at all times, especially if your incubator doesn’t have an automatic thermostat. Some schools turn off the AC or heat at night to save money. Since you’re not at school to monitor and manipulate the thermostat, your eggs may get too hot or cold. Even if you have an automatic thermostat, avoid placing the incubator in front of a window. As the sun shines on the incubator, the temperature will increase and spoil your hatch.
During this two day trial period, plug in your incubator and the egg turner. Monitor the temperature to make sure it stays between 99.5°F to 100°F. Add water to the incubator and monitor the humidity levels using your hygrometer. Look for relative humidity of between 45 and 55 percent—ideal levels for days 1 through 18. If you’re having trouble raising the humidity by adding water, try placing a moist sponge in the incubator or misting the eggs with a spray bottle.
We also placed a webcam in the incubator so family members could watch at home. While it’s wonderful to be able to see it in person, this was helpful because sometimes the hatch doesn’t take place during the school day. If you’re hatch begins after school hours, just send an email to parents so everyone can watch online at home.
Incubating and hatching
Place the small end of the egg down into the cups of the egg turner. If you don’t have an egg turner, you can manually turn the eggs by drawing a circle on one side of the egg and an X on the other, flipping them from the circle to the X three to five times a day. On weekends, you can package the eggs in cartons, wrap the cartons in a towel to keep in heat, and carry your equipment home to continue turning, although removing the eggs from the incubator can be just as bad as not turning them.
For the first 18 days, the eggs should be turned regularly, the temperature should be kept between 99.5°F and 100°F, and relative humidity should stay between 45 and 55 percent. On day 19, increase the humidity to 55 to 65 percent. Also, stop turning the eggs and remove the egg turner from the incubator. The eggs should be placed on their side and left alone until they hatch.
You may begin hearing chirps coming from the eggs as the hatching day nears. Whistle back to encourage them, especially once they make the first break in the shell, called a “pip.”
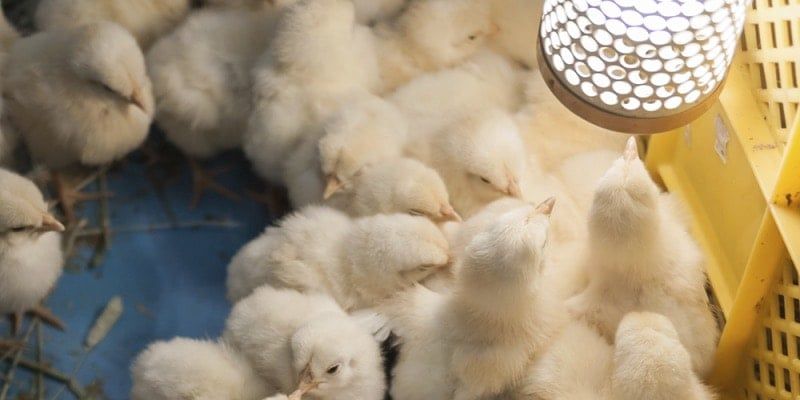
Depending on your incubator, you may need to remove a plug to allow more airflow. It will take many hours for the chick to hatch on its own after the first pip. And although it’s hard, do not help the chick out of the shell. Make sure to have a brooder ready for the chicks as they hatch and dry off otherwise they will be rolling all the other eggs as they stumble around. It usually takes 24 hours for a chick to fully dry off enough to be transferred to the brooder.
Mishaps will occur, but they can teach valuable lessons, too. If an egg is dropped, compose yourself and scoop it up to allow your students see the stage of development. No matter what happens during the incubation experience, students are engaged and learning important life concepts. We’ve experienced everything from perfect incubation and hatches to major pitfalls, yet each instance has been a learning experience for not just the students, but for me, too.
Tags:Learning Wagon


Chicken Whisperer is part of the Catalyst Communications Network publication family.